Just Paper Battles Napoleonics - Instructions2,5d Modular Wargames System
CountersMulti layer PDF-fileYou need to use Adobe Acrobat Reader 6 or higher. We have 4 layers in the file: Layer "text" - the names of units on to bases Layer "figurines" is main layer with all counters Layer "bgr_grass" - optional Layer "bgr_aride" - optional Layer "bgr_snow" - optional (there is in some sets only) Dimensions6mm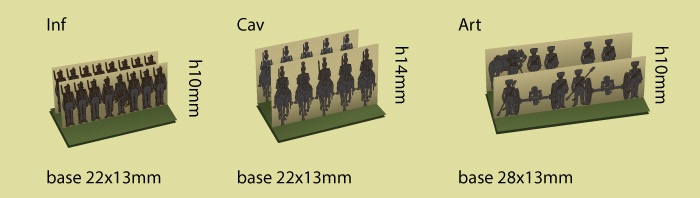
10mm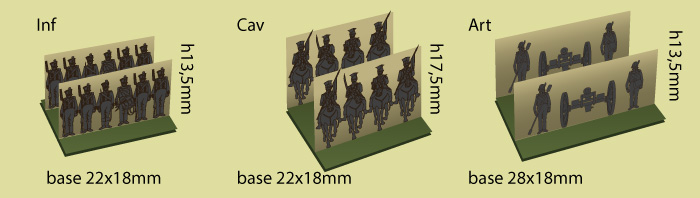
PaperWe used 139 g/m2 (chalk overlay paper). You can see it on photos. But the optimal way to use up to 100-120 g/m2 paper. Cutting and gluing
A necessary tools: - A scissors; - A hobby knife; - A metal ruler (optimal 300mm or 12"); - Some (not sharp) dull pricker (i use the metal tweezers); - A glue stick; - Any middle green and light gray felt-tip pen; The assembly sequenceAttention! The phases 1, 2 and 3 are most important if you want to have a good result. You need some training before the first time. Use one sheet for practic.
PS. If you want to reinforce the bases with cardboard or any other material, you can use the file jpbn_pattern_6mm_a4.pdf (*_US.pdf) as a cut pattern. TerrainMulti layer PDF-fileYou need to use Adobe Acrobat Reader 6 or higher. We have 3 layers in the file: Layer "bgr" is main layer with all hexes and background segments Layer "hexes_black" - solid border of hexes (optional) Layer "hexes_pnt" - dashed border of hexes (optional) DimensionsThe base background segments are 229x198mm (6 diferent ones).
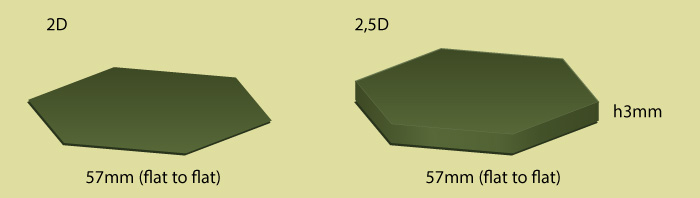
Hexes are 57mm flat to flat. PaperWe used 150 g/m2 (chalk overlay paper). You can see it on photos. But the optimal way to use up to 120-150 g/m2 for for separate hexes and 180-200 g/m2 for a base background segments. Cutting and gluing
A necessary tools: - A scissors; - A hobby knife; - A metal ruler (optimal 300mm or 12"); - Some (not sharp) dull pricker (i use the metal tweezers); - A glue stick; - Any middle green and light gray felt-tip pen; The assembly sequenceRemember! May be you need some training before the first time. Use one sheet for practic.
  
"6mm":
"10mm":
Terrain:
|


 1807-1810 L’Infanterie de Ligne. Modular Paper 2,5D Wargames System")
 1810-1814. Modular Paper 2,5D Wargames System")
. Modular Paper 2,5D Wargames System")
. Modular Paper 2,5D Wargames System")
 1812-1814. Modular Paper 2,5D Wargames System.")
 1812-1815. Modular Paper 2,5D Wargames System.")
 1812-1815. Modular Paper 2,5D Wargames System.")
 1813-1815. Modular Paper 2,5D Wargames System.")
 1815. Modular Paper 2,5D Wargames System.")
 1814-1815. Modular Paper 2,5D Wargames System.")
 1811-1814. Modular Paper 2,5D Wargames System.")
 1812-1814. Modular Paper 2,5D Wargames System.")
 1812-1814. Winter dress. Modular Paper 2,5D Wargames System.")
 1812-1814. Summer dress. Modular Paper 2,5D Wargames System.")

 1807-1810 L’Infanterie de Ligne. Modular Paper 2,5D Wargames System")
 1810-1814. Modular Paper 2,5D Wargames System")
. Modular Paper 2,5D Wargames System")
. Modular Paper 2,5D Wargames System")
 1812-1814. Modular Paper 2,5D Wargames System.")
 1812-1815. Modular Paper 2,5D Wargames System.")
 1813-1815. Modular Paper 2,5D Wargames System.")
 1812-1815. Modular Paper 2,5D Wargames System.")
 1815. Modular Paper 2,5D Wargames System.")
 1814-1815. Modular Paper 2,5D Wargames System")
 1811-1814. Modular Paper 2,5D Wargames System.")
 1812-1814. Modular Paper 2,5D Wargames System.")
 1812-1814. Winter dress. Modular Paper 2,5D Wargames System.")
 1812-1814. Summer dress. Modular Paper 2,5D Wargames System.")
. Modular Paper 2,5D Wargames System.")
. Modular Paper 2,5D Wargames System.")
. Modular Paper 2,5D Wargames System.")
. Modular Paper 2D Wargames System.")