
Counters
Multi layer PDF-file
You need to use Adobe Acrobat Reader 6 or higher.
We have 4 layers in the file:
Layer "text C&C" - the names of units on to bases
Layer "figurines" is main layer with all counters
Layer "bgr_grass" - optional
Layer "bgr_aride" - optional
Layer "bgr_snow" - optional
Dimensions
6mm
10mm
Paper
The optimal way to use up to 100-120 g/m2 paper.
Try the test-files, please: A4 (5,7mb) or US Letter (5,7mb)
Cutting and gluing

A necessary tools:
- A scissors;
- A hobby knife;
- A metal ruler (optimal 300mm or 12");
- Some (not sharp) dull pricker (i use the metal tweezers);
- A glue stick;
- Any middle green and light gray felt-tip pen;
The assembly sequence
Attention! The phases 1 - 3 are most important if you want to have a good result. You need some training before the first time. Use one sheet for practic.
PS. If you need to reinforce the bases with cardboard or any other material, you can use the file Bases6and10mm_A4.pdf (Bases6and10mm_USLetter.pdf) as a cut pattern.
Bases 22x22mm - Bases 44x22mm - Bases 66x30mm - Bases 60x30mm - Army leader's maku - Basing - TOP
Cavalry base 22x22mm
 1. An easier and cleaner fold can be achieved by lightly (or hardy) pressing the fold lines (the lines between notches - - -) with a not sharp pricker or a bodkin prior to folding.
 2. The sequence of operations. From "1" to "23"
 3.
Use the steel ruler and hobby knife for long cutaways (the lines between notches -)
3.
Use the steel ruler and hobby knife for long cutaways (the lines between notches -)
 4. The optimum sequence is from "1" to "9".
 5. Use the steel ruler and hobby knife for short cutaways (the lines between notches -) The optimum sequence is from "1" to "7".
 6.
6.
 7.
Bend all bends by your own fingers)).
7.
Bend all bends by your own fingers)).
 8.
Glue the vertical segments now. Use a glue stick. Put under the weight.
8.
Glue the vertical segments now. Use a glue stick. Put under the weight.
 9. Cut the "grass" strips
 10. Glue the cardboard bases
 11. Bend front and rear tabs
 12. Glue
 13.
13.
 14. Glue the top detaile...
 15.... and lower tab
 16.
Use a green or light gray felt-tip pen for painting of part edges.
16.
Use a green or light gray felt-tip pen for painting of part edges.
 17.
Enjoy!
17.
Enjoy!
Bases 22x22mm - Bases 44x22mm - Bases 66x30mm - Bases 60x30mm - Army leader's maku - Basing - TOP
Double cavalry base 44x22mm (use on 100mm hexes)
1. An easier and cleaner fold can be achieved by lightly (or hardy) pressing the fold lines (the lines between notches - - -) with a not sharp pricker or a bodkin prior to folding.
2.
Use the steel ruler and hobby knife for long cutaways (the lines between notches -)
3.
Use the steel ruler and hobby knife for short cutaways (the lines between notches -)
 4.
Bend all bends by your own fingers)).
4.
Bend all bends by your own fingers)).
 5.
Glue the vertical segments now. Use a glue stick. Put under the weight.
5.
Glue the vertical segments now. Use a glue stick. Put under the weight.
 6. Cut the "grass" strips and glue the cardboard bases
 7. Bend front and rear tabs
 8. Glue
 9.Glue the top detaile...
 10.
... and lower tab
10.
... and lower tab
 11. Use a green or light gray felt-tip pen for painting of part edges.
 12. Enjoy!
Bases 22x22mm - Bases 44x22mm - Bases 66x30mm - Bases 60x30mm - Army leader's maku - Basing - TOP
Cavalry base 66x30mm
1. An easier and cleaner fold can be achieved by lightly (or hardy) pressing the fold lines (the lines between notches - - -) with a not sharp pricker or a bodkin prior to folding.
2.
Use the steel ruler and hobby knife for long cutaways (the lines between notches -)
3.
Use the steel ruler and hobby knife for short cutaways (the lines between notches -)
 4.
Bend all bends by your own fingers)).
4.
Bend all bends by your own fingers)).
 5.
Glue the vertical segments now. Use a glue stick. Put under the weight.
5.
Glue the vertical segments now. Use a glue stick. Put under the weight.
 6. Cut the "grass" strips
 7. ...glue the cardboard bases
 8. Bend front and rear tabs. Glue
 9.Glue the top detaile... and lower tab
 10. Use a green or light gray felt-tip pen for painting of part edges. Enjoy!
Bases 22x22mm - Bases 44x22mm - Bases 66x30mm - Bases 60x30mm - Army leader's maku - Basing - TOP
Cavalry base 60x30mm
1. An easier and cleaner fold can be achieved by lightly (or hardy) pressing the fold lines (the lines between notches - - -) with a not sharp pricker or a bodkin prior to folding.
2.
Use the steel ruler and hobby knife for long cutaways (the lines between notches -)
3.
Use the steel ruler and hobby knife for short cutaways (the lines between notches -)
4.
Bend all bends by your own fingers)).
5.
Glue the vertical segments now. Use a glue stick. Put under the weight.
 6. Cut the "grass" strips
 7. ...glue the cardboard bases. Bend front and rear tabs. Glue
 8. Glue the top detaile. Use a green or light gray felt-tip pen for painting of part edges. Enjoy!
Bases 22x22mm - Bases 44x22mm - Bases 66x30mm - Bases 60x30mm - Army leader's maku - Basing - TOP
Army leader's maku
 1. Bend all bends by your own fingers)).
 2. Glue the vertical segments now. Use a glue stick. Put under the weight.
 3.
3.
 4.
4.
Bases 22x22mm - Bases 44x22mm - Bases 66x30mm - Bases 60x30mm - Army leader's maku - Basing - TOP
Basing
Pike and shote
") Infantry 22x22mm
Infantry 22x22mm
") Infantry and Cavalry 22x22mm
Infantry and Cavalry 22x22mm
") Cavalry 22x22mm
Cavalry 22x22mm
Polemos and Killer Katanas II (use 60x30mm or 66x30mm)
") Infantry ("6mm") 60x30mm
Infantry ("6mm") 60x30mm
") Cavalry ("10mm") 60x30mm
Cavalry ("10mm") 60x30mm
") Cavalry ("6mm") 66x30mm
Cavalry ("6mm") 66x30mm
") Cavalry ("10mm") 66x30mm
Cavalry ("10mm") 66x30mm
") Infantry ("10mm") 66x30mm
Infantry ("10mm") 66x30mm
") Commander's base ("6mm") 30x30mm
Commander's base ("6mm") 30x30mm
") Commander's base ("10mm") 30x30mm
Commander's base ("10mm") 30x30mm
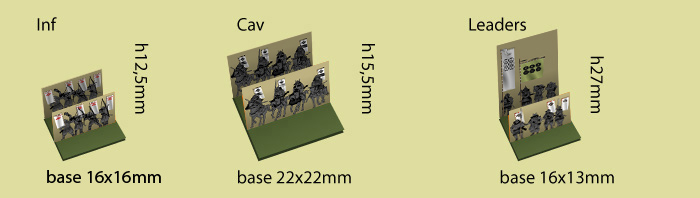
Commands & Colors: Samurai Battles
") Infantry ("6mm")16x16mm
Infantry ("6mm")16x16mm
") Cavalry ("6mm")22x22mm
Cavalry ("6mm")22x22mm
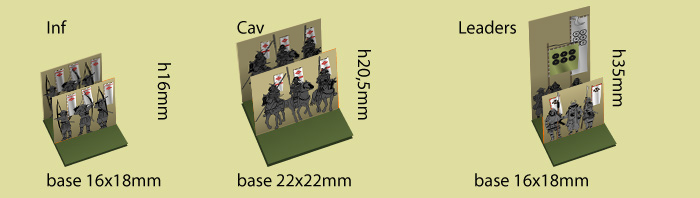
Commands & Colors: Samurai Battles (Hexes 100mm)
") Infantry ("6mm")32x16mm
Infantry ("6mm")32x16mm
") Cavalry ("6mm") 44x22mm
Cavalry ("6mm") 44x22mm
Impetus
") Infantry 40x20mm
Infantry 40x20mm
") Infantry 40x20mm
Infantry 40x20mm
") Cavalry 44x30mm
Cavalry 44x30mm
Bases 22x22mm - Bases 44x22mm - Bases 66x30mm - Bases 60x30mm - Army leader's maku - Basing - TOP


")
")
")
")
")
")
")
")
")
")
")
")
")
")
")
")
")

 1807-1810 L’Infanterie de Ligne. Modular Paper 2,5D Wargames System")
. Modular Paper 2,5D Wargames System")
 1810-1814. Modular Paper 2,5D Wargames System")
. Modular Paper 2,5D Wargames System")
. Modular Paper 2,5D Wargames System")
 1812-1814. Modular Paper 2,5D Wargames System.")
 1812-1815. Modular Paper 2,5D Wargames System.")
 1812-1815. Modular Paper 2,5D Wargames System.")
 1813-1815. Modular Paper 2,5D Wargames System.")
 1815. Modular Paper 2,5D Wargames System.")
 1814-1815. Modular Paper 2,5D Wargames System.")
 1811-1814. Modular Paper 2,5D Wargames System.")
 1812-1814. Modular Paper 2,5D Wargames System.")
 1812-1814. Winter dress. Modular Paper 2,5D Wargames System.")
 1812-1814. Summer dress. Modular Paper 2,5D Wargames System.")

 1807-1810 L’Infanterie de Ligne. Modular Paper 2,5D Wargames System")
 1810-1814. Modular Paper 2,5D Wargames System")
. Modular Paper 2,5D Wargames System")
. Modular Paper 2,5D Wargames System")
 1812-1814. Modular Paper 2,5D Wargames System.")
 1812-1815. Modular Paper 2,5D Wargames System.")
 1813-1815. Modular Paper 2,5D Wargames System.")
 1812-1815. Modular Paper 2,5D Wargames System.")
 1815. Modular Paper 2,5D Wargames System.")
 1814-1815. Modular Paper 2,5D Wargames System")
 1811-1814. Modular Paper 2,5D Wargames System.")
 1812-1814. Modular Paper 2,5D Wargames System.")
 1812-1814. Winter dress. Modular Paper 2,5D Wargames System.")
 1812-1814. Summer dress. Modular Paper 2,5D Wargames System.")
. Modular Paper 2,5D Wargames System.")
. Modular Paper 2,5D Wargames System.")
. Modular Paper 2,5D Wargames System.")
. Modular Paper 2D Wargames System.")